How To Use Laptop As A Monitor For Nintendo Switch
November 19, 2022 4 min read 2 Comments
Nintendo Switch is an instant gaming joy. It's a small device that allows you for ready-to-go gaming. Besides providing a portable gaming journey, Nintendo can offer you comfort by connecting to your TV. You setup your Nintendo system to the TV and enjoy HD gaming.
But what if your TV isn't available? In this case, the only best choice left for you is to connect to a laptop. Wouldn't life be fantastic if you could use the Laptop's screen as a monitor? This short article practically explains how you can use a laptop as a monitor for Nintendo Switch.
How To Use Laptop As Monitor For Nintendo Switch
There are two methods available to connect Nintendo Switch to a laptop.
1- Using an HDMI cable
2- Through capture card
Let’s quickly discuss both methods.
Connect Nintendo Switch To Laptop Using HDMI Cable
A display of Nintendo Switch on your laptop requires the latter to accept HDMI Input. The problem, however, is that modern laptops are HDMI source devices. They send HDMI signals and don't receive them. On the other hand, if your gaming arsenal has an Alienware laptop, you can have Nintendo's display, as most Alienware accepts an HDMI input. To ensure whether your laptop has an HDMI-in or HDMI-out, briefly go through the user manual you get after unboxing the laptop.
In short, this method works fine for those obsessed with gaming and has virtually every gear essential to play a game from any console.
So here is the second method that works for everyone.
How to Use a Laptop As a Monitor With a Capture Card
The second method is more viable. You only need a capture Cardand an HDMI cable. It converts the HDMI signal from your Nintendo Switch into a medium your laptop will detect through the USB port. This is what a capture card looks like.
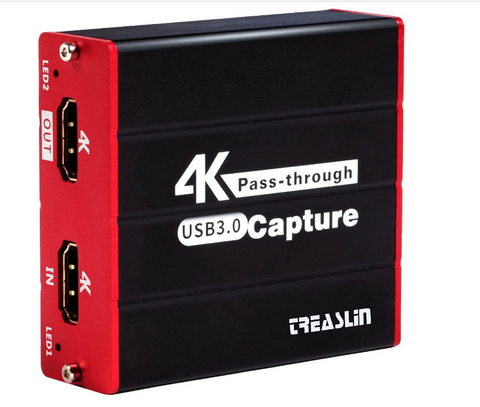
Video Capture Card for Switch. Source: Amazon
Moreover, with capture cards, you’ll be able to get Nintendo’s display on operating systems of Mac, Windows, and Android. A glaring feature of an HDMI capture card is that it works without external power– eliminating the additional need for cables.
Here is your 7-step guidethat will allow you to play Nintendo Switch games on your laptop’s monitor.
Step 1: The Must-Have Accessory
Identify the hardware of your laptop. If your computer has a USB 3.0 port, buy a 3.0-compatible HDMI capture card. But, if your computer contains USB Type-C, ensure you have a capture card with a Type-C connector. It is imperative to note you don’t use adaptersto convert USB Type-C video capture cards into Type-A as this would corrupt the video quality.
Step 2: A High-Quality HDMI Cable
Insert one end of the HDMI cable into the HDMI-out port of the Nintendo Switch docking station. Then put the other end of the HDMI cable into the HDMI input port of the capture card. Now, put the capture card in your laptop’s USB port. At this stage, if you’re using a faulty HDMI cable, the screen will sparkle. It also alludes that an impending blackout is awaiting. So make sure you get a durable HDMI cable with braided nylon coating that smoothly transfers the HDMI signal from Nintendo Switch to a laptop.
Have a look at these inexpensive yet super-fast HDMI cables.
Congratz. You’re done with the hardware part. Time to install software and its settings.
Related Read: Difference Between HDMI Input and Output
Step 3:Setting Up Nintendo Switch For Gameplay and Streaming
Download Open Broadcasting Software (OBS) to enable your PC and Mac to record and stream games on twitch and youtube.OBS supports both Mac and Windows operating systems.
Step 4: Launching OBS
After installing, launch OBS. You’ll see a dashboard– nice and clean.
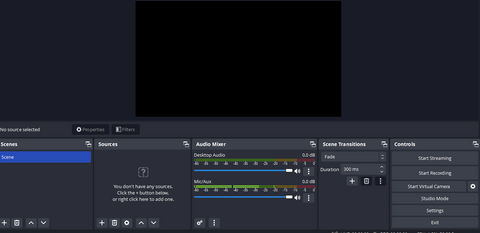
OBS dashboard to get Nintendo Switch Display On Laptop
Step 5: Brining Nintendo On Board
With the capture card plugged in and OBS installed, you're all set to receive Nintendo's display on your monitor. You need to add a source (by playing with settings) on OBS. So, firstly, click on the "+" button, and You'll see a wide range of options expanding.
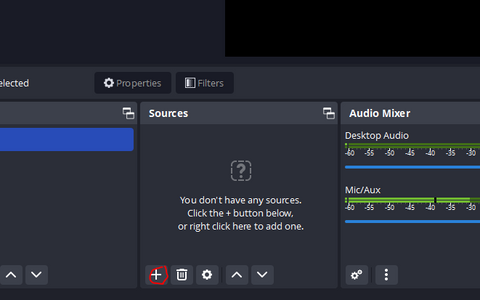
“Add Source” from which the Laptop is supposed to receive display
Then select the source from which you want to get a display. In your case, it would be a "Video Capture Device." As you choose, a new pop-up will flash.
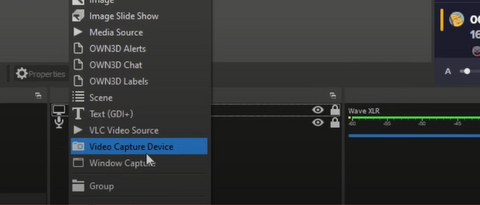
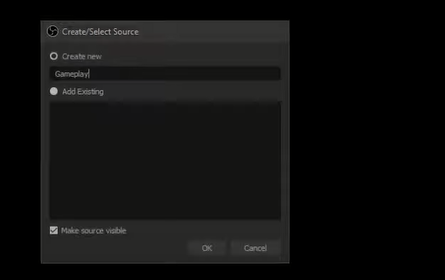
Here you'll name the source. In my case, I've called it Gameplay. You can choose as per your choice. As you click on "ok," another pop-up will open.
Here you select the source from which the video comes. Since I've got a USB 3.0 capture card, I chose USB Video.
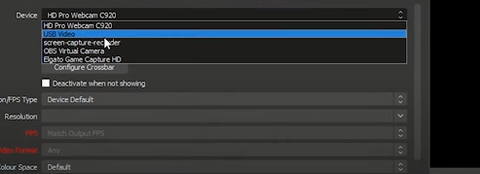
After doing this, your video should appear. Now, tweak with a few audio settings, and BOOM. Your favorite game is now on the laptop screen.
Go to the source again, select Audio Capture Deviceand then create a Device, push Ok. You'll see a new window opening. Now, select audio devices from which you want to extract sound.
I hope you are clear now.
Concluding Remarks From Uni
This article explains straightforward methods that empower you to get a Nintendo Switch display on the laptop. Following the steps mentioned earlier, you transform your laptop’s screen into a monitor. Also, you can employ OBS and kick-start recording and stream in a few minutes. Are you ready to set up a little gaming station using Nintendo Switch and a laptop?
Related Stories:
2 Responses
Kisd adams
June 20, 2023
it did not say usb video it only had the camera
Leave a comment
Comments will be approved before showing up.
Also in Blog
How to Distinguish Low-Quality Electronic Waste on E-Commerce Platforms in 2025
March 19, 2025 3 min read
With the rise of online shopping, distinguishing between high-quality electronics and low-quality e-waste has become a critical skill. Many e-commerce platforms are flooded with questionable products that look appealing but often have serious quality and longevity issues.

Maximizing Your Internet Speed: The Ultimate Guide to Using a USB-C to Ethernet Adapter
July 12, 2024 4 min read
Read More Related Products
Related Stories
1. [Solved] USB C to HDMI Adapter Cable Not Working in 2022
2. Best Product for Remote Work and Entertainment
3. How to Set Up Dual Monitors for Laptop
4. How to use USB-C to HDMI Cable
5. How to spend time at home during the Covid-19 pandemic?
6. How to choose a suitable USB hub at a good price?
7. How does a 2.5G Ethernet Adapter work with my laptop?
8. Why USB C Hubs Are a Must-Have for Mac Users?
--------------------------


Hasse
March 11, 2025
Hello, is there a possible third option. Because the second one costs money.